How to setup the Google Search Console
Google Search Console (GSC) is an essential tool for monitoring your website’s performance in Google Search, identifying potential issues, and optimizing for search engine visibility. Whether you’re running an SEO agency, managing your own website, or just getting started, setting up Google Search Console should be a top priority. Here’s a step-by-step guide to help you set it up and unlock key insights for your site’s SEO strategy.

Step 1: Sign in to Google Search Console
First, go to Google Search Console and sign in with your Google account. If you don’t have an account, you can create one for free.
Step 2: Add Your Website (Property)
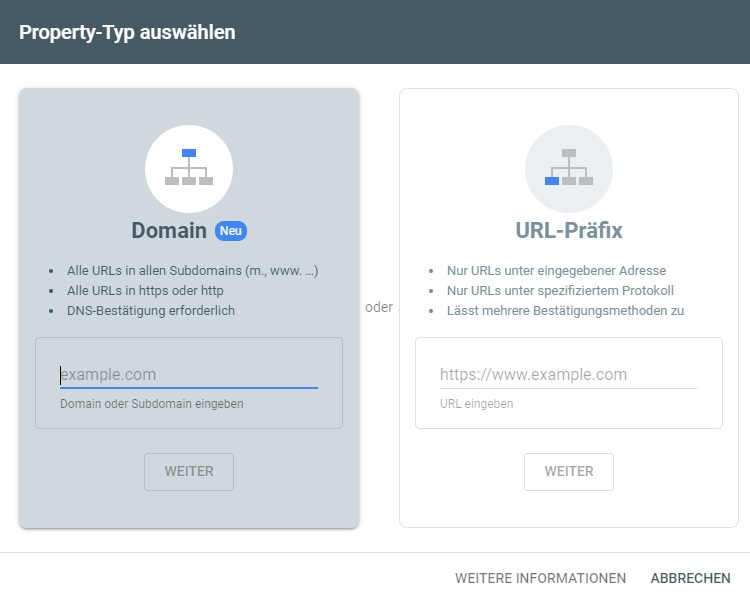
After logging in, you’ll need to add your website as a “property” in Search Console.
- On the dashboard, click the “Add Property” button.
- You’ll be given two options to add your website:
- Domain: This option tracks the entire domain and all subdomains (e.g.,
www.example.comandblog.example.com). - URL Prefix: This option tracks specific URLs (e.g.,
www.example.comonly).
Recommendation: If you’re looking to track your entire domain, choose the “Domain” option for a more comprehensive view.
- Domain: This option tracks the entire domain and all subdomains (e.g.,
Step 3: Verify Website Ownership
After adding your site, you’ll need to verify that you own it. Google offers several methods to do this:
- DNS Verification (For Domain Properties):
- You’ll receive a TXT record to add to your domain’s DNS settings. Instructions will be provided based on your domain host (e.g., GoDaddy, Bluehost, etc.).
- Once you’ve added the record, click “Verify” in Search Console. It may take a few minutes to process.
- HTML File Upload (For URL Prefix Properties):
- Download the HTML verification file provided by Search Console.
- Upload this file to the root directory of your website.
- Once uploaded, click “Verify.”
- Other Methods:
- Google Analytics: If you have Google Analytics set up, you can verify ownership through the same account.
- Google Tag Manager: You can use a GTM account associated with your site for verification.
Once verified, you’ll have access to data in Search Console, although it may take a few days for Google to gather complete performance insights.
Google Search Console (GSC) is an essential tool for monitoring your website’s performance in Google Search, identifying potential issues, and optimizing for search engine visibility. Whether you’re running an SEO agency, managing your own website, or just getting started, setting up Google Search Console should be a top priority. Here’s a step-by-step guide to help you set it up and unlock key insights for your site’s SEO strategy.

Step 1: Sign in to Google Search Console
First, go to Google Search Console and sign in with your Google account. If you don’t have an account, you can create one for free.
Step 2: Add Your Website (Property)
After logging in, you’ll need to add your website as a “property” in Search Console.
- On the dashboard, click the “Add Property” button.
- You’ll be given two options to add your website:
- Domain: This option tracks the entire domain and all subdomains (e.g.,
www.example.comandblog.example.com). - URL Prefix: This option tracks specific URLs (e.g.,
www.example.comonly).
Recommendation: If you’re looking to track your entire domain, choose the “Domain” option for a more comprehensive view.
- Domain: This option tracks the entire domain and all subdomains (e.g.,
Step 3: Verify Website Ownership
After adding your site, you’ll need to verify that you own it. Google offers several methods to do this:
- DNS Verification (For Domain Properties):
- You’ll receive a TXT record to add to your domain’s DNS settings. Instructions will be provided based on your domain host (e.g., GoDaddy, Bluehost, etc.).
- Once you’ve added the record, click “Verify” in Search Console. It may take a few minutes to process.
- HTML File Upload (For URL Prefix Properties):
- Download the HTML verification file provided by Search Console.
- Upload this file to the root directory of your website.
- Once uploaded, click “Verify.”
- Other Methods:
- Google Analytics: If you have Google Analytics set up, you can verify ownership through the same account.
- Google Tag Manager: You can use a GTM account associated with your site for verification.
Once verified, you’ll have access to data in Search Console, although it may take a few days for Google to gather complete performance insights.

 Julian has been working as a full-time SEO since 2016. As a consultant, he has supported over 100 clients and specialised primarily in data analysis. The Google Search Console was always at the centre of this.